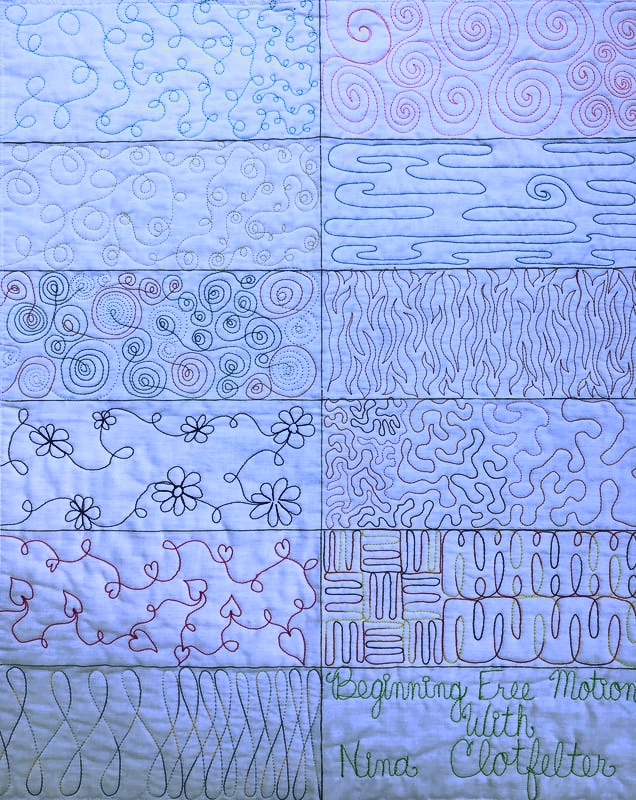
Beginning Free Motion Quilting is so rewarding and fun! In this class we truly start at the beginning and you will "get it"! There are loads of tips and tricks Nina shares throughout class to help you on your new journey successfully. You'll learn 14 quilting designs and options on many, while making a sampler of designs you can refer to later. This is an information packed class, so please be prepared to take notes! We have FUN too!!!
Supply List
* Prep you did for class (next section below)
*3-4 Fat quarter sandwiches – Light color fabric on top, batting, and back. Basted by pins, 505 spray, or hand stitching. Leave 1 sandwich without a top
*Quilting gloves (There will be Machinger for sale in class $9)
*Thread snips
*Drawing Paper and Pencil! – School lined paper is fine
Willingness to make mistakes!
Smile and good attitude!!!
Ready to have some fun!!!
Preparation Before Class
Beginning Free Motion Quilting With Nina Clotfelter
Prep before class
Needed: Solid color Fat Quarter (probably white, so your thread will show up) Marking tool (choose 1 method to mark. Fixion pen, water soluble blue marker, etc...) 24” Ruler
Directions: Please do this on ONE fat quarter
1. Stand your Fat Quarter TALL (21” tall, 18” wide).
2. Measure to find the middle of the 18” width, should be 9”, make a mark so you can do #3.
3. Draw a line down the middle of the 21” tall Fat Quarter.
4. Measure to be sure you have a 21” tall fat quarter. If so, draw a line across the 18” width every 3.5”. If your fat quarter is only 20” tall, draw a line
across every 3 3/8th ”.
5. You should have 12 rectangles, 6 on each side of a center line.
6. Now, on one of the lower 4 sections, just choose 1, make 1” square grid. This will not come out even because your rectangle is not an even measurement. Just make a grid using 1” measurement and let it come out as it does.
7. Sandwich this up with batting and a back and baste in your favorite method. Hand, Machine, or Spray basting (If spray basting only use a LITTLE spray, and I recommend 505 spray.)
8. Baste together FQ in your kit and 2 or 3 others for practice in class.
9. Congratulations! You’re ready to start class!
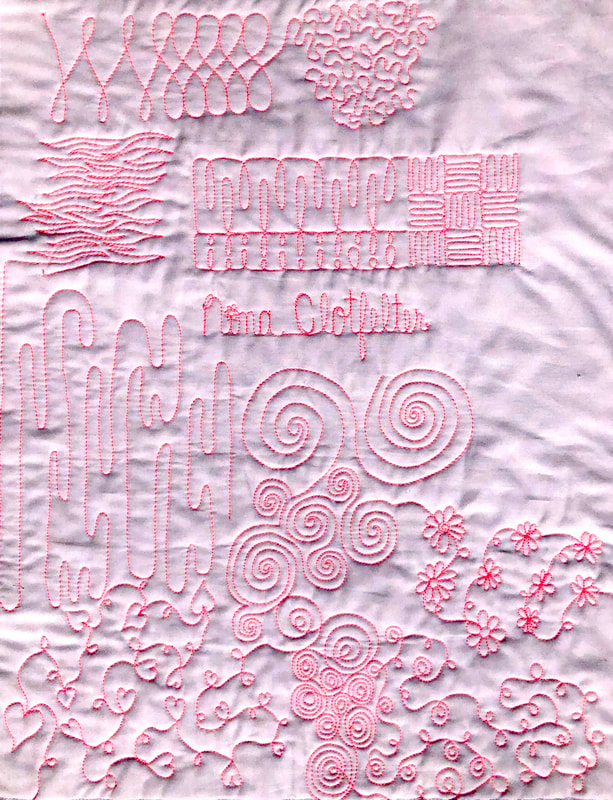
10. Your Fat Quarter should have similiar sections as the photo of the class sample below.
LET’S HAVE FUN!!!
Thank you for taking the time to prepare for class! You have a fun day ahead of you with a class FULL of information! I look forward to getting to know you!
If you have any questions, please don't hesitate to contact me!
Nina Clotfelter
www.ninaquilts.com Nina Clotfelter [email protected]
Prep before class
Needed: Solid color Fat Quarter (probably white, so your thread will show up) Marking tool (choose 1 method to mark. Fixion pen, water soluble blue marker, etc...) 24” Ruler
Directions: Please do this on ONE fat quarter
1. Stand your Fat Quarter TALL (21” tall, 18” wide).
2. Measure to find the middle of the 18” width, should be 9”, make a mark so you can do #3.
3. Draw a line down the middle of the 21” tall Fat Quarter.
4. Measure to be sure you have a 21” tall fat quarter. If so, draw a line across the 18” width every 3.5”. If your fat quarter is only 20” tall, draw a line
across every 3 3/8th ”.
5. You should have 12 rectangles, 6 on each side of a center line.
6. Now, on one of the lower 4 sections, just choose 1, make 1” square grid. This will not come out even because your rectangle is not an even measurement. Just make a grid using 1” measurement and let it come out as it does.
7. Sandwich this up with batting and a back and baste in your favorite method. Hand, Machine, or Spray basting (If spray basting only use a LITTLE spray, and I recommend 505 spray.)
8. Baste together FQ in your kit and 2 or 3 others for practice in class.
9. Congratulations! You’re ready to start class!
10. Your Fat Quarter should have similiar sections as the photo of the class sample below.
LET’S HAVE FUN!!!
Thank you for taking the time to prepare for class! You have a fun day ahead of you with a class FULL of information! I look forward to getting to know you!
If you have any questions, please don't hesitate to contact me!
Nina Clotfelter
www.ninaquilts.com Nina Clotfelter [email protected]
Optional Supply Kit coming soon!
I know when you're travleing to a show there's a lot of things to prep.
I will have a supply kit available for purchase in July with the FQ sandwiches you'll need for class so you don't have to do them.
If you purchase this option, this will be waiting for you in class.
Check back in July